

Raspberry Pi Webサーバーの構築
Nginx リバースプロキシ サーバー
複数の ドメイン別サーバーに振り分ける
Nginx リバースプロキシ サーバー
複数の ドメイン別サーバーに振り分ける
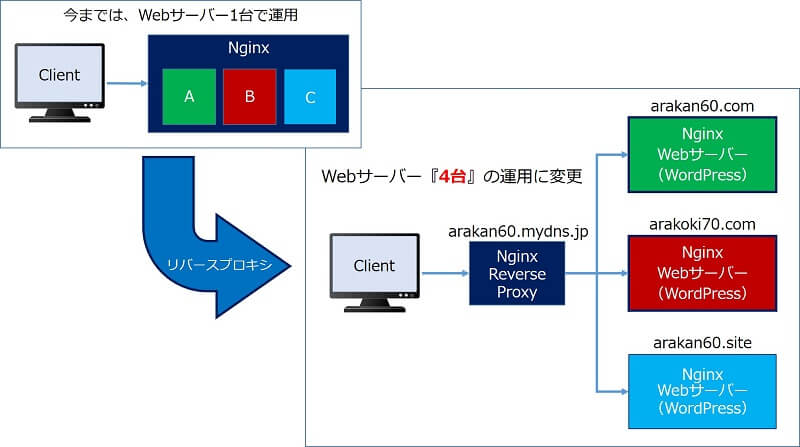
これまで『Raspberry Pi』で、【3つのドメイン別サイト】を【1台のWebサーバー】で運用してきたが、サーバーの負荷分散を図るべく『リバースプロキシ』サーバーを構築し、複数のWebサーバーでの運用に変更した。
以下、Raspberry Pi + nginxで、リバースプロキシを構築した記録。
スポンサー リンク
目 次
1. リバースプロキシの導入目的
★ 立ち上げる「WordPress」サイトの限界に直面する ★
使用中の「Raspberry Pi 4」スペック。
プロセッサ: Broadcom BCM2711 1.5GHz
メモリ: 4GB LPDDR4 SDRAM
メモリ: 4GB LPDDR4 SDRAM
立ち上げっている「WordPressサイト」の数=4。

5つ目の「WordPressサイト」を立ち上げたところ、
プラグインをインストールした時点で、
レスポンスが極端に悪化して使い物にならず。
プラグインをインストールした時点で、
レスポンスが極端に悪化して使い物にならず。
この限界を打破すべく、1台で運用してきたWebサーバーを、ドメイン別のWebサーバー『4台』の運用に変更し、負荷分散を図ることにした。
公開出来るWebサーバーは1台のみ
Webサーバーを外部に向かって公開する場合、ルーターのポートフォワーディング設定で、WAN側のポートとLAN側サーバーの【IPアドレス✙ポート】とを紐付けるため、Webサーバーで使われる 【Port 80 と Port 443】が割当可能なサーバーは1台のみとなる。
Webサーバーを外部に向かって公開する場合、ルーターのポートフォワーディング設定で、WAN側のポートとLAN側サーバーの【IPアドレス✙ポート】とを紐付けるため、Webサーバーで使われる 【Port 80 と Port 443】が割当可能なサーバーは1台のみとなる。
そこで、アクセスされるドメイン名(ホスト名)で、Webサーバーへの振り分けを行う『リバースプロキシ』サーバーを構築し、複数のWebサーバーでの運用に変更することにした。
2. リバースプロキシのシステム構成
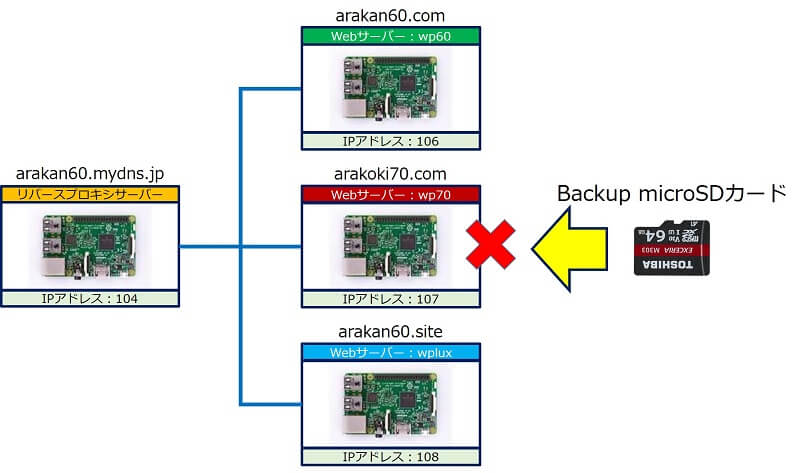
「Raspberry Pi 4 4GB」4台を、スイッチングハブに接続。
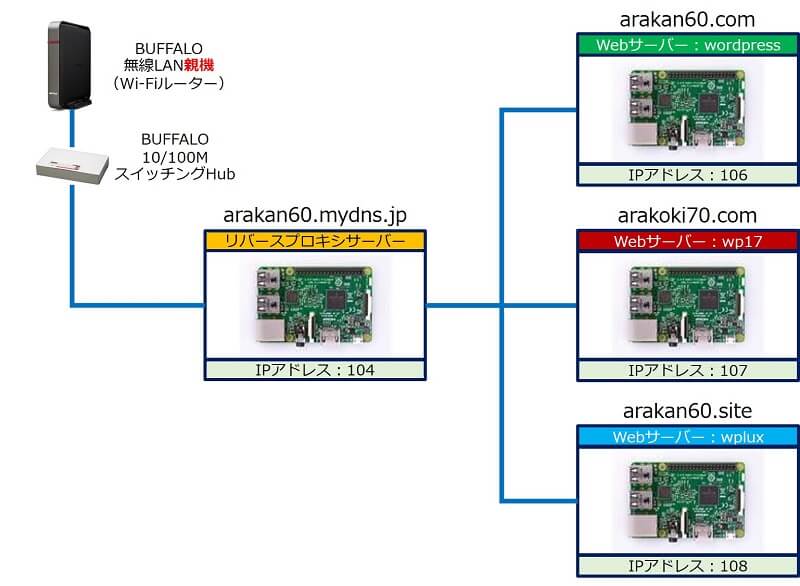
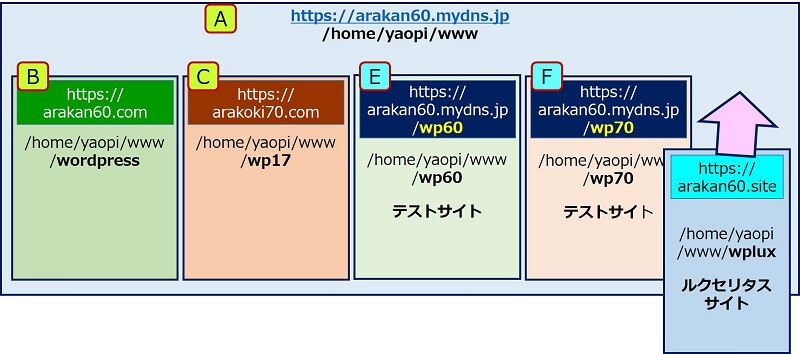
『リバースプロキシ』サーバーは、ドメイン【arakan60.mydns.jp】のHTMLサイトのWebサーバーとの兼用にした。
バックエンドのWebサーバー3台は、それぞれドメイン別の「WordPress」専用Webサーバーとした。
移行要領。
【1台のWebサーバー】で運用していた状態の、
『Raspberry Pi』の microSDカードを、
【 img 】で、バックアップ & リストアして「4枚」作成し、
それぞれのサーバー毎に、不要なファイルを削除する方法で移行した。
『Raspberry Pi』の microSDカードを、
【 img 】で、バックアップ & リストアして「4枚」作成し、
それぞれのサーバー毎に、不要なファイルを削除する方法で移行した。
3. リバースプロキシにおけるnginxの設定要件
「Raspberry Pi 4 4GB」4台全てに【Nginx + PHP + MariaDB】をインストールして、Webサーバーを構築。
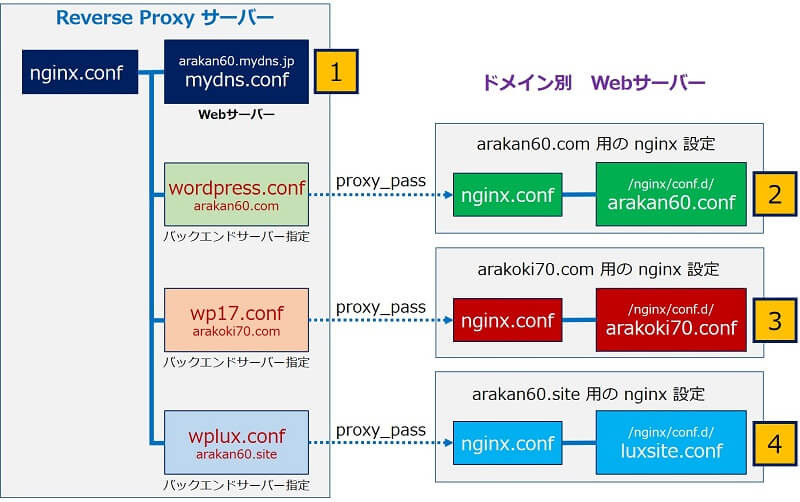
それぞれのサーバー毎に、【nginx.conf + /conf.d/xxxxx.conf】の設定が必要になる。
①.sslの設定について
1台のWebサーバーで運用していた時点から、全てのサイトをSSL化しており、WordPressがバックエンドになるが、URLは【https】のままとする。
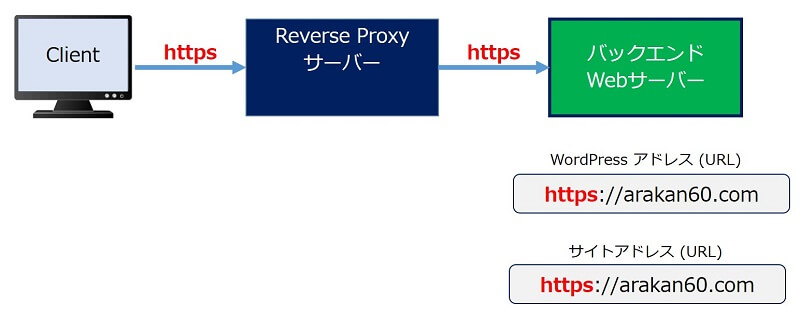
このために、リバースプロキシのバックエンドとフロントエンドの通信をSSL化、 →【 proxy_pass に https のURLを設定】する。
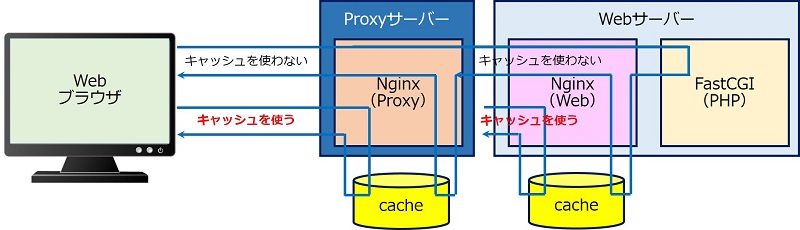
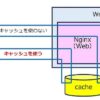
②.proxy_cacheの設定について
1台のWebサーバーで運用していた時点から、全てのサイトに【fastcgi_cache】の設定をしていた。

リバースプロキシのフロントエンドには【proxy_cache】を設定を行い、よく分からないまま、バックエンドの【fastcgi_cache】設定を残したままとした。
これで、キャッシュが2段構えになったのだろうか?
③.ブラウザキャッシュについて
1台のWebサーバーで運用していた時点から、全てのサイトに【ブラウザキャッシュ】の設定をしていた。
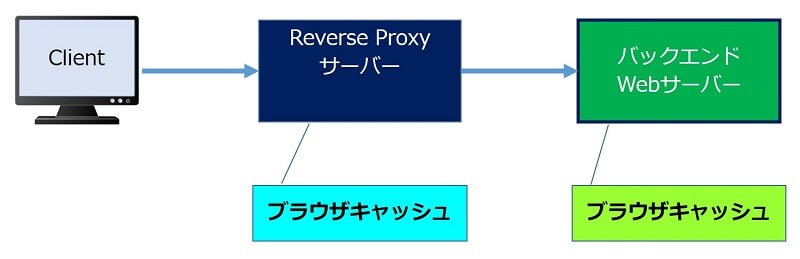
フロントエンドに【ブラウザキャッシュ】の設定を行うと同時に、バックエンドの【ブラウザキャッシュ】設定を残したままにした。
④.gzipについて
1台のWebサーバーで運用していた時点から、全てのサイトに【gzip】の設定をしていた。
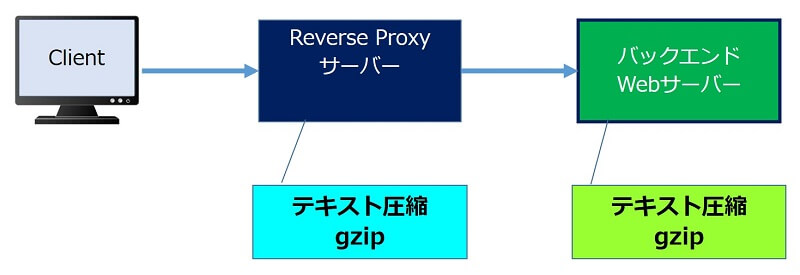
フロントエンドに【gzip】の設定を行うと同時に、バックエンドの【gzip】設定を残したままにした。
4. nginxの設定事例
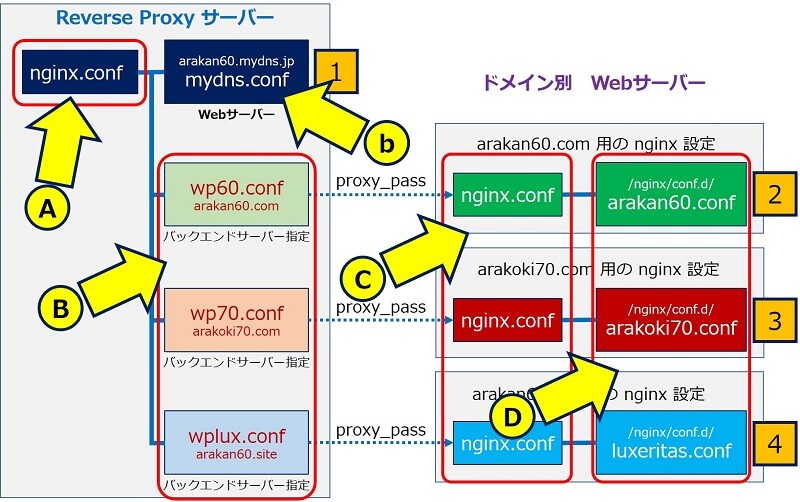
A:Reverse Proxy サーバーの【nginx.conf】。
user  nginx;
worker_processes auto;
worker_rlimit_nofile 100000;

error_log  /var/log/nginx/error.log warn;
pid        /var/run/nginx.pid;

events {
    worker_connections 1024;
    multi_accept on;
    use epoll;
}

http {
    server_tokens off;
    sendfile on;
    tcp_nopush on;
    tcp_nodelay on;
    access_log off;
    keepalive_timeout 10;
    client_header_timeout 10;
    client_body_timeout 10;
    reset_timedout_connection on;
    send_timeout 10;
    limit_conn_zone $binary_remote_addr zone=addr:5m;
    limit_conn addr 100;

    include       /etc/nginx/mime.types;
    default_type  application/octet-stream;

	##
	# SSL Perfect Forward Secrecy(PFS)を有効にする Settings
	##

	ssl_protocols TLSv1 TLSv1.1 TLSv1.2; # Dropping SSLv3, ref: POODLE
	ssl_prefer_server_ciphers on;

	# 安全でない暗号化スイートはサポートしない
	# ssl_ciphers  'ECDH !aNULL !eNULL !SSLv2 !SSLv3';
	ssl_ciphers "EECDH+ECDSA+AESGCM EECDH+aRSA+AESGCM EECDH+ECDSA+SHA384 EECDH+ECDSA+SHA256 EECDH+aRSA+SHA384 EECDH+aRSA+SHA256 EECDH+aRSA+RC4 EECDH EDH+aRSA RC4 !aNULL !eNULL !LOW !3DES !MD5 !EXP !PSK !SRP !DSS !RC4";

	#HTTP Strict Transport Security --- HSTSの設定
	add_header Strict-Transport-Security 'max-age=31536000; includeSubDomains; preload';

    log_format  main  '$remote_addr - $remote_user [$time_local] "$request" '
                      '$status $body_bytes_sent "$http_referer" '
                      '"$http_user_agent" "$http_x_forwarded_for"';

    access_log  /var/log/nginx/access.log  main;

    gzip  on;
    gzip_vary on;
    gzip_proxied any;
    gzip_min_length 1024;
    gzip_comp_level 6;
    gzip_buffers 16 8k;
    gzip_http_version 1.1;
    gzip_types text/plain
		 text/xml
		 text/css
		 text/javascript
		 image/gif
		 image/png
		 image/jpeg
		 application/javascript
		 application/x-javascript
		 application/json
		 application/xml
		 application/xml+rss
		 application/font-woff
		 application/font-tff
		 application/octet-stream;

    open_file_cache max=100000 inactive=20s;
    open_file_cache_valid 30s;
    open_file_cache_min_uses 2;
    open_file_cache_errors on;

    # ブラウザキャッシュの設定
    expires 30d;

    server_names_hash_bucket_size 128;

    proxy_buffering       on;
    proxy_buffer_size     8k;
    proxy_buffers         100 8k;
    proxy_cache_path      /var/cache/nginx/proxy_file_cache levels=2:2 keys_zone=cache_key:15m inactive=1d max_size=5g;
    proxy_temp_path       /var/cache/nginx/temp 1 2;
    proxy_connect_timeout 60;
    proxy_read_timeout    90;
    proxy_send_timeout    60;
    proxy_cache_valid     200 2h;
    proxy_cache_valid     302 2h;
    proxy_cache_valid     301 4h;
    proxy_cache_valid     any 1m;

    include /etc/nginx/conf.d/*.conf;
}
b:Reverse Proxy サーバーに同居するサイトの【/conf.d/xxxxx.conf】。
server {
        listen 80;
        server_name www.arakan60.mydns.jp;
        return 301 https://arakan60.mydns.jp$request_uri;
}

server {
	listen 80;
	server_name arakan60.mydns.jp;
	return 301 https://$host$request_uri;
}

server {
	listen 443 ssl;
	server_name arakan60.mydns.jp;
	root /home/yaopi/www;
	index index.html index.htm index.php;

	# ssl on;
	ssl_certificate /etc/letsencrypt/live/arakan60.mydns.jp/fullchain.pem;
	ssl_certificate_key /etc/letsencrypt/live/arakan60.mydns.jp/privkey.pem;

	error_page 404 /pc_404.html;
	location = /pc_404.html {
		root /home/yaopi/www;
		internal;
	}

	client_max_body_size 500M;  # ←追加

	# デフォルト 60秒を300秒までアップします。
	fastcgi_read_timeout 300;

	# nginx リダイレクト設定

	# pass the PHP scripts to FastCGI server listening on 127.0.0.1:9000
	#
	location ~ \.php$ {
		fastcgi_split_path_info ^(.+\.php)(/.+)$;
		fastcgi_pass unix:/var/run/php/php7.3-fpm.sock;
		fastcgi_index index.php;
		fastcgi_param SCRIPT_FILENAME $document_root$fastcgi_script_name;
		include fastcgi_params;
	}

}
B:Reverse Proxy サーバーがバックエンドのWebサーバーに振り分けるための【/conf.d/xxxxx.conf】。
server {
    listen 80;
    server_name arakan60.com;
    rewrite ^(.*)$ https://$host$1 permanent;
}

server {
    listen 443 ssl;
    server_name arakan60.com;

    ssl_certificate /etc/letsencrypt/live/arakan60.com/fullchain.pem;
    ssl_certificate_key /etc/letsencrypt/live/arakan60.com/privkey.pem;

    client_max_body_size 500M;  # ←ここにも追加
    fastcgi_read_timeout 300;

    proxy_set_header X-Real-IP $remote_addr;
    proxy_set_header X-Forwarded-Proto $scheme;
    proxy_set_header X-Forwarded-For $proxy_add_x_forwarded_for;
    proxy_set_header Host $http_host;

    location / {
        proxy_pass https://192.168.11.106;

        # 基本はキャッシュしない
        set $do_not_cache 1;

        # 画像のみキャッシュさせる
        if ($uri ~* "\.(jpg|jpeg|png|gif|css|js|ico)$") {
            set $do_not_cache 0;
        }
        proxy_no_cache $do_not_cache;

        # キャッシュの検索
        proxy_cache_bypass $do_not_cache;

        # バックエンド no-cache を無視
        proxy_ignore_headers Cache-Control;

        # キャッシュのキーゾーンを指定
        proxy_cache cache_key;

        # キャッシュの有効時間を指定
        proxy_cache_valid 200 302 60m;
        proxy_cache_valid 404 10m;

        # キャッシュのステータスヘッダーを追加
	add_header X-Cache-Status $upstream_cache_status;
    }
}
C:バックエンドのWebサーバーの【nginx.conf】。
user  nginx;
worker_processes auto;
worker_rlimit_nofile 100000;

error_log  /var/log/nginx/error.log warn;
pid        /var/run/nginx.pid;

events {
    worker_connections 1024;
    multi_accept on;
    use epoll;
}

http {
    server_tokens off;
    sendfile on;
    tcp_nopush on;
    tcp_nodelay on;
    access_log off;
    keepalive_timeout 10;
    client_header_timeout 10;
    client_body_timeout 10;
    reset_timedout_connection on;
    send_timeout 10;
    limit_conn_zone $binary_remote_addr zone=addr:5m;
    limit_conn addr 100;

    include       /etc/nginx/mime.types;
    default_type  application/octet-stream;

	##
	# SSL Perfect Forward Secrecy(PFS)を有効にする Settings
	##

	ssl_protocols TLSv1 TLSv1.1 TLSv1.2; # Dropping SSLv3, ref: POODLE
	ssl_prefer_server_ciphers on;

	# 安全でない暗号化スイートはサポートしない
	# ssl_ciphers  'ECDH !aNULL !eNULL !SSLv2 !SSLv3';
	ssl_ciphers "EECDH+ECDSA+AESGCM EECDH+aRSA+AESGCM EECDH+ECDSA+SHA384 EECDH+ECDSA+SHA256 EECDH+aRSA+SHA384 EECDH+aRSA+SHA256 EECDH+aRSA+RC4 EECDH EDH+aRSA RC4 !aNULL !eNULL !LOW !3DES !MD5 !EXP !PSK !SRP !DSS !RC4";

	#HTTP Strict Transport Security --- HSTSの設定
	add_header Strict-Transport-Security 'max-age=31536000; includeSubDomains; preload';

    log_format  main  '$remote_addr - $remote_user [$time_local] "$request" '
                      '$status $body_bytes_sent "$http_referer" '
                      '"$http_user_agent" "$http_x_forwarded_for"';

    access_log  /var/log/nginx/access.log  main;

    gzip  on;
    gzip_vary on;
    gzip_proxied any;
    gzip_min_length 1024;
    gzip_comp_level 6;
    gzip_buffers 16 8k;
    gzip_http_version 1.1;
    gzip_types text/plain
		 text/xml
		 text/css
		 text/javascript
		 image/gif
		 image/png
		 image/jpeg
		 application/javascript
		 application/x-javascript
		 application/json
		 application/xml
		 application/xml+rss
		 application/font-woff
		 application/font-tff
		 application/octet-stream;

    open_file_cache max=100000 inactive=20s;
    open_file_cache_valid 30s;
    open_file_cache_min_uses 2;
    open_file_cache_errors on;

# ブラウザキャッシュの設定
 expires 30d;
#map $sent_http_content_type $expires {
#  default         off;
#  text/css 8d;
#  text/javascript 8d;
#  application/javascript 8d;
#  ~image/         30d;
#}
#expires $expires;

server_names_hash_bucket_size 128;

    proxy_buffering         on;
    fastcgi_buffer_size     8k;
    fastcgi_buffers         100 8k;
    fastcgi_temp_path       /var/cache/nginx/temp 1 2;
    fastcgi_connect_timeout 60;
    fastcgi_read_timeout    90;
    fastcgi_send_timeout    60;
    fastcgi_cache_valid     200 2h;
    fastcgi_cache_valid     302 2h;
    fastcgi_cache_valid     301 4h;
    fastcgi_cache_valid     any 1m;

# fastcgi cache on arakan60.com
fastcgi_cache_path /var/cache/nginx/arakan60 levels=1:2 keys_zone=arakan60:30m max_size=512M inactive=600m;

fastcgi_cache_key "$scheme$request_method$host$request_uri";

# cache 404 or other
fastcgi_ignore_headers Cache-Control Expires Set-Cookie;

# return old cache if PHP crashes
fastcgi_cache_use_stale error timeout invalid_header http_500;


    include /etc/nginx/conf.d/*.conf;
}
D:バックエンドのWebサーバーの【/conf.d/xxxxx.conf】。
server {
        listen 80;
	server_name www.arakan60.com;
        return 301 https://arakan60.com$request_uri;
}

server {
	listen 443 ssl;
	server_name www.arakan60.com;

	# ssl on;
	ssl_certificate /etc/letsencrypt/live/www.arakan60.com/fullchain.pem;
	ssl_certificate_key /etc/letsencrypt/live/www.arakan60.com/privkey.pem;
	return 301 https://arakan60.com$request_uri;
}

server {
        listen 80;
	server_name arakan60.com;
        return 301 https://arakan60.com$request_uri;
}

server {
	listen 443 ssl;
	server_name arakan60.com;
	root /home/yaopi/www/wordpress;
	index index.htm index.php;

	# ssl on;
	ssl_certificate /etc/letsencrypt/live/arakan60.com/fullchain.pem;
	ssl_certificate_key /etc/letsencrypt/live/arakan60.com/privkey.pem;

	# デフォルト 60秒を300秒までアップします。
	fastcgi_read_timeout 300;

	client_max_body_size 500M;  # ←追加

	location / {
		try_files $uri $uri/ /index.php;
	}

	#ブラウザキャッシュの設定
	location ~ .*\.(css|js|ico|gif|jpeg|jpg|webp|png|svg|eot|otf|woff|woff2|ttf|ogg) {
		access_log off; #アクセスログをOFF
		expires 30d; #有効期限
	}

	#
	# pass the PHP scripts to FastCGI server listening on 127.0.0.1:9000
	#
	location ~ \.php$ {
		fastcgi_split_path_info ^(.+\.php)(/.+)$;
	#	fastcgi_pass 127.0.0.1:9000;
		fastcgi_pass unix:/var/run/php/php7.3-fpm.sock;
		fastcgi_index index.php;
		fastcgi_param SCRIPT_FILENAME $document_root$fastcgi_script_name;
		include fastcgi_params;

		set $do_not_cache 0;

		### wordpress check to do not cache.

		#  -- POST or HEAD ?
		if ($request_method != "GET") {
		set $do_not_cache 1;
		}

		#  -- Login or Comment or Post Editting ?
		if ($http_cookie ~ ^.*(comment_author_|wordpress_logged_in|wp-postpass_).*$) {
		set $do_not_cache 1;
		}

		fastcgi_cache arakan60;
		fastcgi_cache_valid 200 60m;
		fastcgi_no_cache $do_not_cache;
		fastcgi_cache_bypass $do_not_cache;
		add_header X-F-Cache $upstream_cache_status;

	}

}
5. リバースプロキシにおける「nginxの設定」まとめ
プロキシキャッシュの設定について。
【fastcgi_cache】と【proxy_cache】の違いについて、よくわからないまま上記の設定を行い、上手くいったので、この後【proxy_cache_path】を「ドメイン別」の設定に変更した。
参考:
バックエンドのWebサーバーにおける「nginxの設定」は、
1台のWebサーバーで運用していた時の設定と同じで良い。
【 proxy_pass に https のURLを設定】すれば、【listen 80;】は不要。
1台のWebサーバーで運用していた時の設定と同じで良い。
【 proxy_pass に https のURLを設定】すれば、【listen 80;】は不要。
バックエンドとフロントエンドの通信をSSL化、
→【 proxy_pass に https のURLを設定】する。
→【 proxy_pass に https のURLを設定】する。
バックエンドのWordPressで、大きいファイルをアップロードすると、
『413 Request Entity Too Large』のエラーが出る。
バックエンドサーバー指定の conf にも、
【client_max_body_size 500M; 】の設定が必要。
『413 Request Entity Too Large』のエラーが出る。
バックエンドサーバー指定の conf にも、
【client_max_body_size 500M; 】の設定が必要。
サブディレクトリーでバックエンドのWebサーバーに振ることも可能。
【proxy_pass https://192.168.11.109/wp70t;】
【proxy_pass https://192.168.11.109/wp70t;】
サブディレクトリーでのバックエンドのWebサーバーの【/conf.d/xxxxx.conf】。
【 arakoki70.com/wp70t 】の例。
【 arakoki70.com/wp70t 】の例。
server {
	listen 443 ssl;
	server_name arakoki70.com;
	root /home/yaopi/www/;
	index index.html index.htm index.php;

	# ssl on;
	ssl_certificate /etc/letsencrypt/live/arakoki70.com/fullchain.pem;
	ssl_certificate_key /etc/letsencrypt/live/arakoki70.com/privkey.pem;

	# デフォルト 60秒を300秒までアップします。
	fastcgi_read_timeout 300;

	client_max_body_size 500M;  # ←追加

	location ~ ^/wp70t/(.+\.php) {
		fastcgi_pass unix:/var/run/php/php7.3-fpm.sock;
		fastcgi_index   index.php;
		fastcgi_param   SCRIPT_FILENAME $document_root$fastcgi_script_name;
		include         fastcgi_params;

		set $do_not_cache 0;

		### wordpress check to do not cache.

		#  -- POST or HEAD ?
		if ($request_method != "GET") {
		set $do_not_cache 1;
		}

		#  -- Login or Comment or Post Editting ?
		if ($http_cookie ~ ^.*(comment_author_|wordpress_logged_in|wp-postpass_).*$) {
		set $do_not_cache 1;
		}

		fastcgi_cache wp70t;
		fastcgi_cache_valid 200 60m;
		fastcgi_no_cache $do_not_cache;
		fastcgi_cache_bypass $do_not_cache;
		add_header X-F-Cache $upstream_cache_status;

	}

	location ~ ^/wp70t/(.*)$ {
		index  index.php;
		try_files /wp70t/$1 /wp70t/$1/ /wp70t/index.php?$1&$args;
	}

}
6. リバースプロキシのメリット
★ サーバー運用が劇的に容易になる
①.全ドメインが一斉にダウンすることがない。
②.バックアップシステムへの交換が簡単にできる。
③.サーバーのメインテナンス中における代替サーバーの利用が可能。
④.自由に、サーバーの追加が出来る。
Raspberry Pi 4台による「リバースプロキシ」システム用に作成したラック。
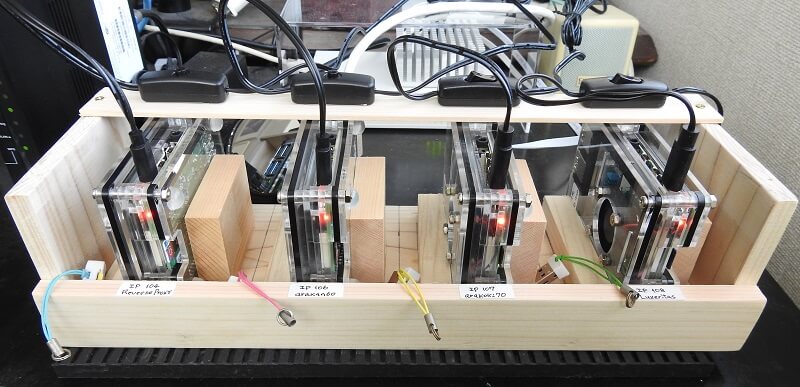
FAN付きのケースに入れたRaspiを、縦に立てるラックを、百均で購入した木材と接着剤で作成。
参考:Reverse Proxy Server と 全てのWebサーバーの「SSD化」による高速化

以上。
(2020.03.26)
(2020.03.26)
スポンサー リンク