

Ubuntu Desktop 22.04 LTS ノウハウ
MariaDB
公式リポジトリを使ってインストール
MariaDB
公式リポジトリを使ってインストール
一般的な手順の「aptコマンド」を使ってインストールを試みると、
「壊れた変更禁止パッケージがあります。」
というエラーが出る。
「壊れた変更禁止パッケージがあります。」
というエラーが出る。
「MariaDB Server Repositories」
以下、やむなく「MariaDB公式リポジトリ」を使用して、特定のバージョンのMariaDBをインストールした記録。
スポンサー リンク
目 次
1. aptコマンドを使ってインストールを試みるとエラーが出る
一般的な MariaDB のインストール手順。
sudo apt-get update
sudo apt-get -y install mariadb-server
sudo apt-get -y install mariadb-server
エラーの内容。「壊れた変更禁止パッケージがあります。」
パッケージリストを読み込んでいます... 完了
依存関係ツリーを作成しています... 完了
状態情報を読み取っています... 完了
インストールすることができないパッケージがありました。
おそらく、あり得ない状況を要求したか、(不安定版ディストリビューションを使用しているのであれば) 必要なパッケージがまだ作成されていなかったり Incoming から移動されていないことが考えられます。
以下の情報がこの問題を解決するために役立つかもしれません:
以下のパッケージには満たせない依存関係があります:
mariadb-server : 依存: mariadb-server-10.6 (>= 1:10.6.16-0ubuntu0.22.04.1) しかし、インストールされようとしていません
E: 問題を解決することができません。壊れた変更禁止パッケージがあります。
この後、MariaDBのリポジトリを使ってインストールすると解決した。
2. MariaDBリポジトリの追加要領
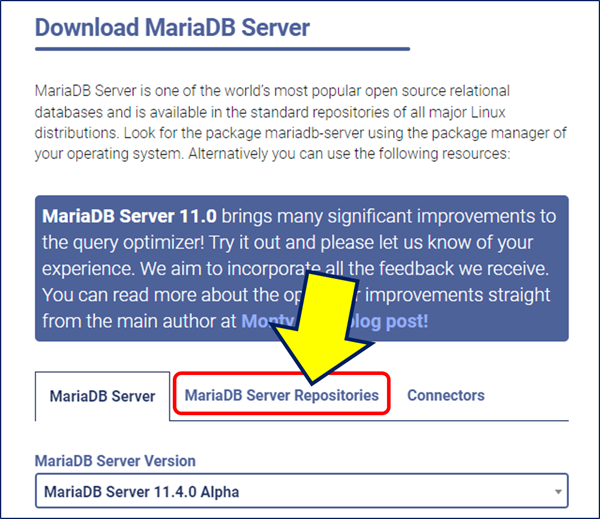
「Download MariaDB Server」画面に遷移するので、「MariaDB Server Repositories」タブをクリックする。

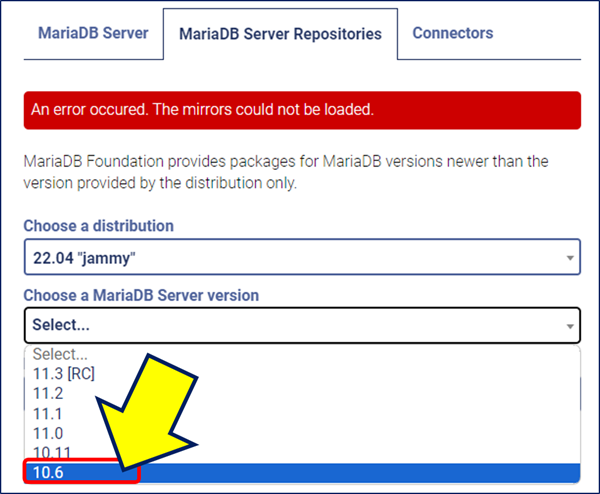
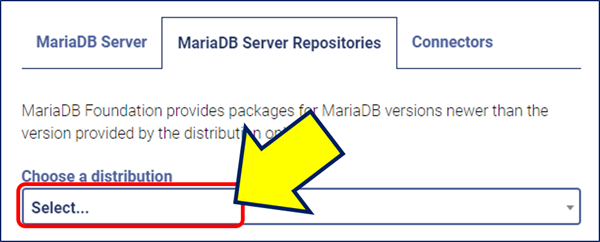
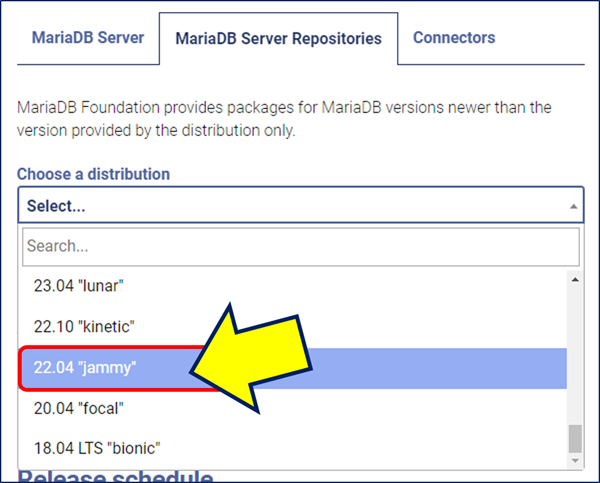
「Choose a distribution」の「Select」をクリックする。
Ubuntuのバージョンの中から「22.04 "jammy"」を選択する。
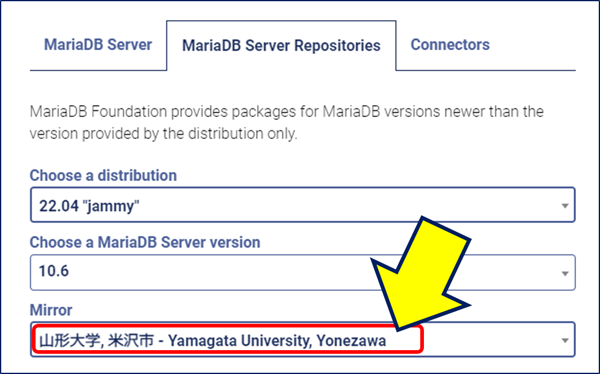
「Choose a MariaDB Server version」をクリックして、MariaDBのバージョンを選択する。(ここでは、10.6を選択)
「Mirror」にダウンロードサイトが自動的にセットされる。
以上の設定を行うと、その下部に、上記の設定に基づくリポジトリの登録要領とインストール手順が表示される。
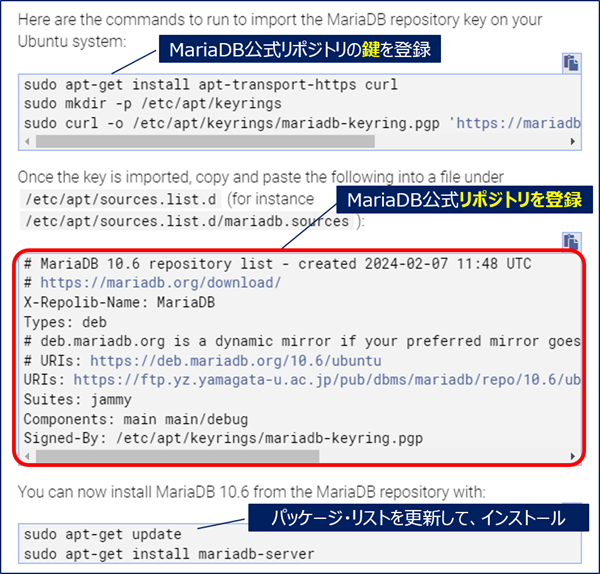
①.一番上は、
「Ubuntu システムに MariaDB リポジトリ キーをインポートするために実行するコマンド」が提示される。
「Ubuntu システムに MariaDB リポジトリ キーをインポートするために実行するコマンド」が提示される。
②.二番目には、
「/etc/apt/sources.list.d/にmariadb.sourcesを作成」
という、MariaDB公式リポジトリの登録内容が提示される。
「/etc/apt/sources.list.d/にmariadb.sourcesを作成」
という、MariaDB公式リポジトリの登録内容が提示される。
③.三番目には、
パッケージ・リストを更新して、MariaDBをインストールするコマンドが表示される。
パッケージ・リストを更新して、MariaDBをインストールするコマンドが表示される。
3. MariaDBの公式リポジトリを登録してインストール
①.MariaDB公式リポジトリの鍵を登録。
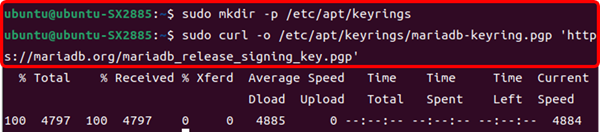
Ubuntu システムに MariaDB リポジトリ キーをインポートすコマンドを実行する。
Ubuntu システムに MariaDB リポジトリ キーをインポートすコマンドを実行する。
sudo apt-get install apt-transport-https curl
sudo mkdir -p /etc/apt/keyrings
sudo curl -o /etc/apt/keyrings/mariadb-keyring.pgp 'https://mariadb.org/mariadb_release_signing_key.pgp'
sudo mkdir -p /etc/apt/keyrings
sudo curl -o /etc/apt/keyrings/mariadb-keyring.pgp 'https://mariadb.org/mariadb_release_signing_key.pgp'
②.MariaDB公式リポジトリを登録。
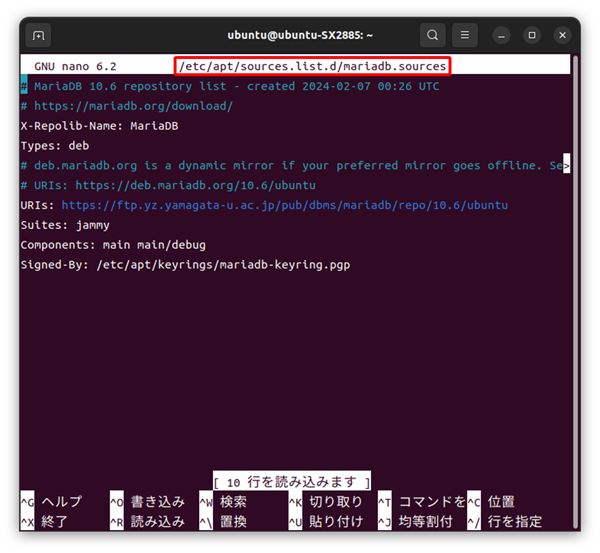
/etc/apt/sources.list.d/に、「mariadb.sources」を作成。
/etc/apt/sources.list.d/に、「mariadb.sources」を作成。
sudo nano /etc/apt/sources.list.d/mariadb.sources
「mariadb.sources」に貼り付ける内容。
(このソースリストで、MariaDBのバージョンが指定される。)
(このソースリストで、MariaDBのバージョンが指定される。)
# MariaDB 10.6 repository list - created 2024-02-07 00:26 UTC
# https://mariadb.org/download/
X-Repolib-Name: MariaDB
Types: deb
# deb.mariadb.org is a dynamic mirror if your preferred mirror goes offline. See https://mariadb.org/mirrorbits/ for details.
# URIs: https://deb.mariadb.org/10.6/ubuntu
URIs: https://ftp.yz.yamagata-u.ac.jp/pub/dbms/mariadb/repo/10.6/ubuntu
Suites: jammy
Components: main main/debug
Signed-By: /etc/apt/keyrings/mariadb-keyring.pgp
③.パッケージ・リストを更新して、インストール。
sudo apt-get update
sudo apt-get install mariadb-server
sudo apt-get install mariadb-server
④.インストールされたバージョンの確認。
mariadb --version
「10.6.16」がインストールされた。

4. セキュリティ設定
最低限のセキュリティ設定が必要。
sudo mysql_secure_installation
ubuntu@ubuntu-SX2885:~$ sudo mysql_secure_installation
[sudo] ubuntu のパスワード:

NOTE: RUNNING ALL PARTS OF THIS SCRIPT IS RECOMMENDED FOR ALL MariaDB
      SERVERS IN PRODUCTION USE!  PLEASE READ EACH STEP CAREFULLY!

In order to log into MariaDB to secure it, we'll need the current
password for the root user. If you've just installed MariaDB, and
haven't set the root password yet, you should just press enter here.

Enter current password for root (enter for none):
OK, successfully used password, moving on...

Setting the root password or using the unix_socket ensures that nobody
can log into the MariaDB root user without the proper authorisation.

You already have your root account protected, so you can safely answer 'n'.

Switch to unix_socket authentication [Y/n] n
 ... skipping.

You already have your root account protected, so you can safely answer 'n'.

Change the root password? [Y/n] y
New password: xxxxxxx
Re-enter new password: xxxxxxx
Password updated successfully!
Reloading privilege tables..
 ... Success!


By default, a MariaDB installation has an anonymous user, allowing anyone
to log into MariaDB without having to have a user account created for
them.  This is intended only for testing, and to make the installation
go a bit smoother.  You should remove them before moving into a
production environment.

Remove anonymous users? [Y/n] y
 ... Success!

Normally, root should only be allowed to connect from 'localhost'.  This
ensures that someone cannot guess at the root password from the network.

Disallow root login remotely? [Y/n] y
 ... Success!

By default, MariaDB comes with a database named 'test' that anyone can
access.  This is also intended only for testing, and should be removed
before moving into a production environment.

Remove test database and access to it? [Y/n] y
 - Dropping test database...
 ... Success!
 - Removing privileges on test database...
 ... Success!

Reloading the privilege tables will ensure that all changes made so far
will take effect immediately.

Reload privilege tables now? [Y/n] y
 ... Success!

Cleaning up...

All done!  If you've completed all of the above steps, your MariaDB
installation should now be secure.

Thanks for using MariaDB!
・Enter current password for root (enter for none):
カレントパスワードは空なので、何も押さずにエンターキーを押す。
・Switch to unix_socket authentication [Y/n]
「unix_socket authentication」は無効化したいので、「n」を入力し、エンターキーを押す。
・You already have your root account protected, so you can safely answer 'n'.
rootパスワードを変更したいので、「Y」を入力し、エンターキーを押す。
設定したいrootパスワードを入力し、エンターキーを押す。
入力確認で、設定したいrootパスワードを再度入力し、エンターキーを押す。
・Remove anonymous users? [Y/n]
アノニマスユーザーを削除したいので、「Y」を入力し、エンターキーを押す。
・Disallow root login remotely? [Y/n]
ルートのリモートログインは許可したくないので、「Y」を入力し、エンターキーを押す。
・Remove test database and access to it? [Y/n]
テストデータベースは削除したいので、「Y」を入力し、エンターキーを押す。
・Reload privilege tables now? [Y/n]
権限テーブルをすぐに反映させたいので、「Y」を入力し、エンターキーを押す。
サービスの状態を確認。
systemctl status mariadb
5. 新しいデータベースの作成
ルート権限で実行。
sudo su
mysql -u root
MariaDB [(none)]> use mysql
mysql -u root
MariaDB [(none)]> use mysql
データベースの作成。(データベース名:ondodb)
MariaDB [(none)]> create database ondodb;
MariaDB [(none)]> create database ondodb;
作成したデータベースに、ユーザー名( flaskpy)とパスワード(xxxxxxx)を設定。
MariaDB [mysql]> grant all on ondodb.* to flaskpy@localhost identified by'xxxxxxx';
MariaDB [mysql]> grant all on ondodb.* to flaskpy@localhost identified by'xxxxxxx';
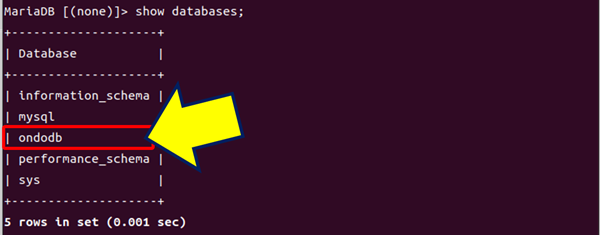
作成されたデータベースの確認。
MariaDB [mysql]> show databases;
MariaDB [mysql]> show databases;
作成したデータベースに、バックアップをリストアしてみる。
mysql -uflaskpy -pxxxxxxx -hlocalhost ondodb < /home/ubuntu/work/ondodb-backup_01.sql
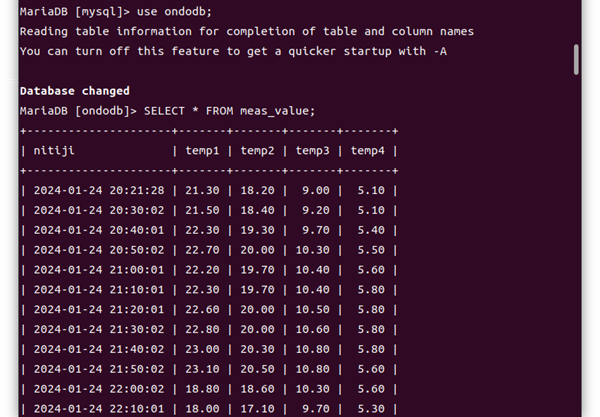
テーブルの中身を見る。
MariaDB [(none)]> use ondodb;
MariaDB [ondodb]> SELECT * FROM meas_value;
MariaDB [ondodb]> SELECT * FROM meas_value;
以上。
(2024.02.07)
スポンサー リンク