WordPress Twenty Sixteen カスタマイズ
SNSボタンをまとめたショートコードを作成し、
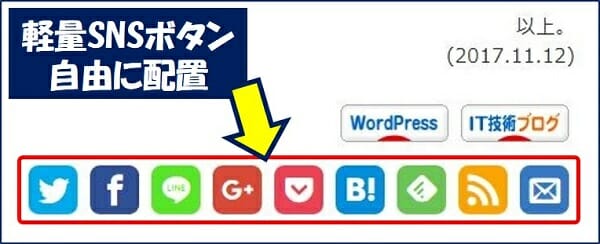
任意の場所に表示
SNSボタンをまとめたショートコードを作成し、
任意の場所に表示
①.「PageSpeed Insights」で測定すると、【 Poor 】と遅い。
②.「WP Social Bookmarking Light」プラグインを使用しているが、表示位置が自由にならない。
②.「WP Social Bookmarking Light」プラグインを使用しているが、表示位置が自由にならない。
以下、ソーシャルボタンをPHPで作成し、そのPHPファイルをショートコードにする方法を纏めた。
スポンサー リンク
目 次
- 1. ソーシャルボタンの作成要領
- ※ Webフォントを使用し、シェア画面をポップアップ表示
- 2. ショートコードの作り方
- ※ 幾つもの『ショートコード』を自由に自作できるようにする
1. ソーシャルボタンの作成要領
できるだけページの表示速度を早くすると共に、「PageSpeed Insights」でjavascriptの圧縮やキャッシュ時間を長くしろと注意されないように・・・したい。
ソーシャルボタンは、ボタン1つ1つにscriptタグ、画像、iframe等が含まれており、これらを読み込む必要がある。複数のボタンを設置すると、同じように1つ1つのscript、画像等を読み込むことになり、ボタンの数が多い程読み込みには時間がかかる。そこで、ボタンの画像を使わずにボタン自体をCSSで作成し、且つ、アイコンにはウェブフォントを使う事で軽量化する。
①.Webフォントを用意する。
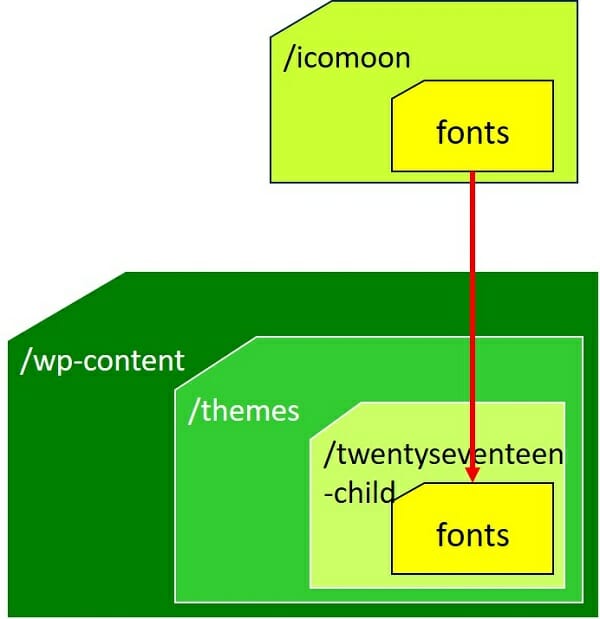
ウェブサービスアイコンフォントのダウンロードサイトから「Webフォント」をダウンロードして解凍する。「icomoon」フォルダができるので、テーマ直下にコピーする。
「icomoon」フォルダをそのまま使っても良いが、この中のCSSファイルを読込ませないために、「icomoon」フォルダ内にある「fonts」フォルダをテーマのCSSファイルが置かれているフォルダに移動し、「icomoon」フォルダ内にある「style.css」の中身を自分のCSSファイルに追加する。
②.「style.css」にソーシャルボタン用のスタイルシートを追記する。
子テーマの style.css に追記。
/*-----------------------------------------------------------*/
/* 軽量のソーシャルボタン */
/*-----------------------------------------------------------*/
.sns ul{
margin: 5px;
padding: 0;
list-style: none;
}

.sns li{
display: inline;
padding: 0;
margin: 5px;
float: right;
}

@font-face {
  font-family: 'icomoon';
  src: url("fonts/icomoon.eot?-qz7pb2");
  src: url("fonts/icomoon.eot?#iefix-qz7pb2") format("embedded-opentype"), url("fonts/icomoon.woff?-qz7pb2") format("woff"), url("fonts/icomoon.ttf?-qz7pb2") format("truetype"), url("fonts/icomoon.svg?-qz7pb2#icomoon") format("svg");
  font-weight: normal;
  font-style: normal;
}
/* line 256, ../scss/app.scss */
[class^="icon-"], [class*=" icon-"] {
  font-family: 'icomoon';
  speak: none;
  font-style: normal;
  font-weight: normal;
  font-variant: normal;
  text-transform: none;
  line-height: 1;
  color: #fff;
  font-size: 25px;
  /* Better Font Rendering =========== */
  -webkit-font-smoothing: antialiased;
  -moz-osx-font-smoothing: grayscale;
}

.icon-feedly:before {
  padding: 0px;
  content: "\e601";
}

.feedly {
  background-color: #6cc655;
}

.icon-rss:before {
  padding: 0px;
  content: "\ea9b";
}

.rss {
  background-color: #ffa500;
}

.icon-mail:before {
  padding: 0px;
  content: "\e945";
}

.mail {
  background-color: #3579C7;
}

.icon-hatebu:before {
  padding: 0px;
  content: "\e00a";
}

.hatena {
  background-color: #008fde;
}

.icon-line:before {
  padding: 0px;
  content: "\e009";
}

.line {
  background-color: #5ae628;
}

.icon-pocket:before {
  padding: 0px;
  content: "\e008";
}

.pocket {
  background-color: #ee4256;
}

.icon-google-plus:before {
  padding: 0px;
  content: "\ea8b";
}

.googleplus {
  background-color: #db4a39;
}

.icon-facebook:before {
  padding: 0px;
  content: "\ea90";
}

.facebook {
  background-color: #305097;
}

.icon-twitter:before {
 padding: 0px;
  background-color: #00aced;
  content: "\ea96";
}

.twitter {
  background-color: #00aced;
}

sns_box ul li {
  float: left;
  margin-right: 10px;
}

.social {
  position: relative;
  border-radius: 8px;
  width: 40px;
  height: 40px;
  display: block;
  padding: 8px;
}

.sns_box a:hover {
  opacity: 0.6;
  filter: alpha(opacity=60);
  -moz-opacity: 0.6;
}
.clear {
	clear:both; /*floatの解除、ここがポイント*/
}
/* 軽量のソーシャルボタン ここまで */
③.ソーシャルボタン用のphpファイルを作る。
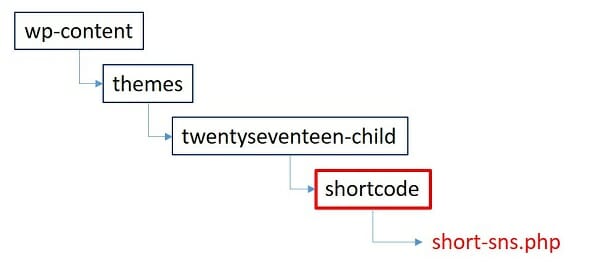
このファイルは、後述の『shortcode』ディレクトリに保存する。
ここでは【 short-sns.php 】という名前にした。
ここでは【 short-sns.php 】という名前にした。
<?php
$url_encode   = urlencode(get_permalink());
$title_encode = urlencode(get_the_title());
?>

<div class="sns_box">
  <ul class="sns">

    <li class="sns">
      <a href="mailto:?subject=サイトを共有しますを共有します有しますbody=この記事php echo $url_encode; ?>" class="social mail">
        <span class="icon-mail"></span>
      </a>
    </li>

   <li class="sns">
      <a href="RSS" class="social rss" onclick="window.open('http://feeds.feedburner.com/arakoki70-feed', '_blank'); return false;">
        <span class="icon-rss"></span>
      </a>
    </li>

    <li class="sns">
      <a href="Feedly" class="social feedly" onclick="window.open('https://feedly.com/#subscription/feed/https://feeds.feedburner.com/arakoki70-feed', '_blank'); return false;">
        <span class="icon-feedly"></span>
      </a>
    </li>

    <li class="sns">
      <a href="Hatena" class="social hatena" onclick="window.open('http://b.hatena.ne.jp/add?mode=confirm&url=<?php echo $url_encode; ?>', '_blank', 'width=640,height=480,top=' + (screen.height-640)/2 + ',left=' + (screen.width-480)/2); return false;">
        <span class="icon-hatebu"></span>
      </a>
    </li>

    <li class="sns">
      <a href="Pocket" class="social pocket" onclick="window.open('http://getpocket.com/save?url=<?php echo $url_encode; ?>', '_blank', 'width=640,height=480,top=' + (screen.height-640)/2 + ',left=' + (screen.width-480)/2); return false;">
        <span class="icon-pocket"></span>
      </a>
    </li>

    <li class="sns">
      <a href="Google+" class="social googleplus" onclick="window.open('https://plus.google.com/share?url=<?php echo $url_encode; ?>', '_blank', 'width=640,height=480,top=' + (screen.height-640)/2 + ',left=' + (screen.width-480)/2); return false;">
        <span class="icon-google-plus"></span>
      </a>
    </li>

    <li class="sns">
      <a href="Line" class="social line" onclick="window.open('http://line.me/R/msg/text/?<?php echo $title_encode; ?>%0D%0A<?php echo $url_encode; ?>', '_blank'); return false;">
        <span class="icon-line"></span>
      </a>
    </li>

    <li class="sns">
      <a href="Facebook" class="social facebook" onclick="window.open('https://www.facebook.com/sharer/sharer.php?src=bm&u=<?php echo $url_encode; ?>&t=<?php echo $title_encode; ?>', '_blank', 'width=640,height=480,top=' + (screen.height-640)/2 + ',left=' + (screen.width-480)/2); return false;">
        <span class="icon-facebook"></span>
      </a>
    </li>

    <li class="sns">
      <a href="Twitter" class="social twitter" onclick="window.open('http://twitter.com/share?text=<?php echo $title_encode; ?>&tw_p=tweetbutton&url=<?php echo $url_encode; ?>', '_blank', 'width=640,height=480,top=' + (screen.height-640)/2 + ',left=' + (screen.width-480)/2); return false;">
        <span class="icon-twitter"></span>
      </a>
    </li>

  </ul>
  <div class="clear"></div>
</div>
SNSボタンのリンク先【 URL 】の設定要領 ←こちらを参照
※:参考にさせて頂いたサイト。
2. ショートコードの作り方

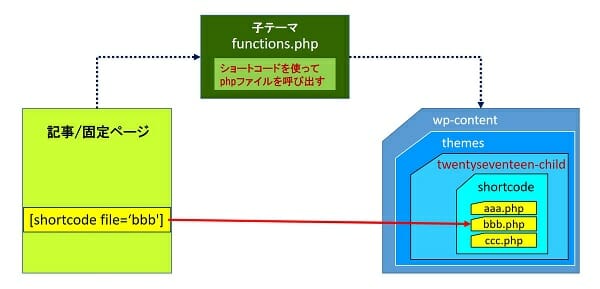
上図のように、
①.『shortcode』ディレクトリを作りその中にPHPプログラムを入れる。
②.『functions.php』にショートコードを使ってphpファイルを呼び出す処理を追記する。
③.記事や固定ページに『ショートコード』を埋め込む。
これで、幾つもの『ショートコード』を自由に自作できるようになる。
① functions.phpに以下のコードを追記する。
子テーマを使用している場合。
/*-----------------------------------------------------------*/
/* 【子テーマ用】ショートコードを使ってphpファイルを呼び出す */
/*-----------------------------------------------------------*/
//【参考】https://nobbi.jp/wordpress-shortcode/

function my_php_Include($params = array()) {
	extract(shortcode_atts(array('file' => 'default'), $params));
	ob_start();
	include(STYLESHEETPATH . "/shortcode/$file.php");
	return ob_get_clean();
}
add_shortcode('shortcode', 'my_php_Include');

/*-----------------------------------------------------------*/
親テーマを使用している場合。
/*-----------------------------------------------------------*/
/* 【親テーマ用】ショートコードを使ってphpファイルを呼び出す */
/*-----------------------------------------------------------*/
//【参考】https://nobbi.jp/wordpress-shortcode/

function my_php_Include($params = array()) {
	extract(shortcode_atts(array('file' => 'default'), $params));
	ob_start();
	 include(get_theme_root() . '/' . get_template() . "/shortcode/$file.php");
	return ob_get_clean();
}
add_shortcode('shortcode', 'my_php_Include');

/*-----------------------------------------------------------*/
② shortcodeディレクトリを作成する。
子テーマを使用している場合。
/ wp-content/ themes/ twentyseventeen-child/shortcode
子テーマを使用している場合。
/ wp-content/ themes/ twentyseventeen/shortcode
/ wp-content/ themes/ twentyseventeen-child/shortcode
子テーマを使用している場合。
/ wp-content/ themes/ twentyseventeen/shortcode
③ショートコードの書き方
file=‘xxx' の xxx にphpのファイル名を入れる。
※:参考にさせて頂いたサイト。
投稿ページでPHPを動かしたいならショートコードを使おう
投稿ページでPHPを動かしたいならショートコードを使おう
これで、ソーシャルボタンを任意の場所に、自由に設置できるようになった。


